My mother, Betty, was an incredibly creative person and a talented artist. Like most wives and mothers in the 40's/50's, she did not pursue a career outside the home but used her creativity to make clothes, decorate our home, and volunteer to be the artist/craft leader for all groups. Both my sister and I were in awe of her abilities but instead of intimidating us, she encourage us and supplied the materials and opportunities to follow her. This quilt is dedicated to her.
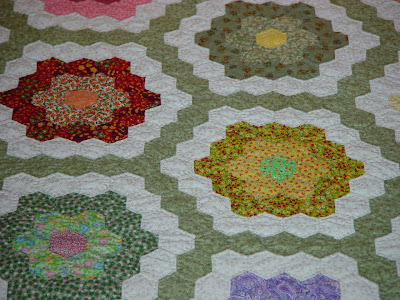
Most of the fabrics for this quilt came from her scraps. It contains memories of clothes she made for herself, my sister and I, and her granddaughters.
As I commented to Jackie, I didn't follow the conventional technique for grandmother's garden because I didn't know any better. As I cut the hexagons, I marked each corner with pencil. Matching these dots, I joined the seams with alternating running stitch and backstitch. I really found this less time and work intensive because I didn't cut paper templates, press under the seam allowance or baste. Maybe it wasn't the "right" way but it worked.
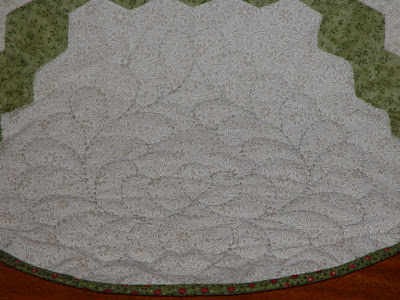
I hand quilted this queen size bed topper. The whole process took about 2 years with other projects in between. As of yet I have no granddaughters to pass on this heirloom so if my oldest son doesn't have any girls, it will go to our first granddaughter-in-law.
Tuesday, March 31, 2009
Sunday, March 29, 2009
It's Time Again for "Challenge Walk MS"
Kathi and I have been friends for over 35 years. She was diagnosed with Multiple Shas never diminished. I made this colorful lap quilt for her last year and she loves that it draws people to come over and talk to her.
My niece also has a long time friend, Rita, who has MS. As part of Team Momentum, Abby will walk with friends who have known Rita since High School.
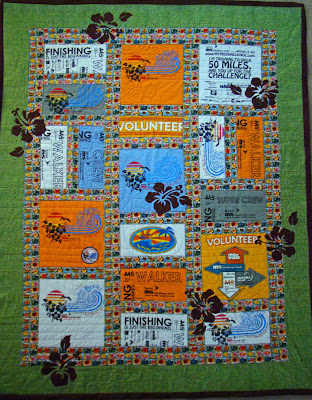
Abby raises additional money by raffling a quilt that she and I make. This was last year's and we will be starting another very soon.
The T-shirts for the walkers and volunteers become the focus and create the theme. Tropical stamp fabric was perfect for the sashing and palm tree flannel became the backing. The hibiscus flower was scanned from the logo and enlarged. I used fusible web (see "Mon" entry) and machine applique to create this shadow effect.
Friday, March 27, 2009
Spring on the California Coast
I just returned from a 5 day trip to the Northern California Coast. We stayed in B & B's in Santa Cruz and Moss Beach which allowed us to drive to Monterey, Carmel, Pacific Grove, Half Moon Bay, San Francisco, and Salsalito. The weather was wonderful, crisp and clear allowing for beautiful vistas.
I found a gem of a quilt shop in Pacific Grove called Back Porch and of course bought fabric. The owner said they have quilters come from all over to stay and participate in workshops. We missed their quilt show by one week, Boo-Hoo.
The intersecting lines of these cypress trees inspired an idea for slashing strips and reassembling to create patterns.
We visited the Filoli Estate in Woodside off Hwy 280 on our way back to the San Jose Airport. The grand house and flowering English gardens were spectacular. This needlepoint picturing the garden house and grounds is part of a room screen.
Interlacing branches and colorful blooms give inspiration to quilt ideas.
Friday, March 20, 2009
"Memories of an Art Teacher"
My husband is gone on a business trip for the week. Its the perfect time to lay out a project that requires continuous revision. I had cut up my teaching t-shirts as part of my retirement clean out and set them aside. I originally thought I'd do a fund raising quilt for California Art Teacher Assoc but after reviewing the pictures, I realized that they were too personal and held too many memories for me.
Several challenges ensued: 1) to add the correct amount of sashing to each block so the widths and heights added up to the correct measurement. 2) trying to use only fabrics from my stash. 3) to balance and tied the colors together from all the different t-shirts. I'm not sure of the result or what to do next? Do I add a border? What color?
Thursday, March 19, 2009
“MON” Japanese Family Crests
Yae is a very special lady in my life. At age 80+ she still works as an aide at my school and is respectfully called Grandma by the students. Over the 20 years at South Pointe Middle School, I was blessed to have Yae worked with me at various times. Yae survived internment camp during WWII without bitterness, recovered from brain injury due to a fall, and continues to work daily with kids at risk. I designed and made this quilt with love and admiration for the person she is.
My design was base on "Diane's Garden" , a "stained glass" look achieved by fusing colorful pieces of fabric onto a black fabric background. I used Lite Steam-A-Seam2 to apply crest appliques to background, a double stick fusible web sandwiched between transparent papers. Applique design is 1) traced in reverse on paper liner 2) second paper liner is removed, 3) web side is ironed to wrong side of fabric, 4) design is cut out, 5) remaining paper liner is removed, 6) fabric cut-out is ironed to background fabric, 7) edge is machine appliqued using a blind hem stitch or zigzag.
Mons are Japanese family crests handed down from generation to generation through the female members of a family. I found these in books and online although I had to redesign them to minimize the number of parts and increase connections. After Yae received the quilt, she told me that her family has a crest. I wish I had know this ahead of time and could have used it too.
The day I decided to give Yae her gift turned out to be the one year anniversary of her husband's death. I didn't intend to cause her grief but unintentionally she said I made a sad day better.
Tuesday, March 17, 2009
"ROCKIN' WITH JESUS" Collaboration
I meet once a month with my church quilt group. We make baby quilts for newborns and the nursery as well as our current projects. This quilt was made for our Woman's Retreat where it was raffled to support Woman's Ministries. Each quilter made several strips measuring the same length using their choice of bright colors but also incorporating black and white. When we came together it was magical.
My contribution was the zigzags and these 50"s girls. Our inspiration came from "Churn Dash II" in Collaborative Quilting by Freddy Moran and Gwen Marston.
Sue Martinez is our star applique quilter. She crafted these wonderful 50's motifs by hand.
My contribution was the zigzags and these 50"s girls. Our inspiration came from "Churn Dash II" in Collaborative Quilting by Freddy Moran and Gwen Marston.
Sue Martinez is our star applique quilter. She crafted these wonderful 50's motifs by hand.
Wednesday, March 11, 2009
"IRISES and PEONIES"
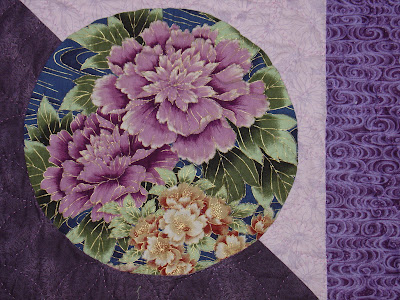
As I've said before, my daughter-in-law loves purple. She also loves large bloom flowers. When she graduated as a Doctor of Veterinary Medicine, I made this lap quilt for her. The pattern, Circles of the East, was presented by my Adult Ed. teacher but the applique technique was passed on to me by a good quilting friend.
After looking at photos and quilt images of irises, I drew my own representation. Each piece was traced and the final sheet of pattern pieces scanned. These were then printed on contact/label paper and cut out. The sticky side is placed on the right side of the fabric and cut adding seam allowance. Using a glue stick, edges are turned under with a pointed tool such as an awl. When dry, the contact pattern is removed so it can be used again.
To assemble the flower, place the original drawing inside a baggie (place a cardboard inside too). Glue base pieces to the plastic and top pieces to underlying fabric. The completed flower can then be pulled up, pinned to the background and hand stitched. Note: The glue doesn't interfere with the hand applique process, doesn't make the fabric stiff and will eventually wash out.
The remaining circles were fussy cut from as Asian fabric of peonies and koi. I then hand quilted around the flowers and an Asian pattern in the background.
Labels:
applique,
asian prints,
fussy cut,
glue stick,
hand quilting,
iris
Monday, March 9, 2009
Pass it on...generations sewing together
Autumn, my grandniece, made this pillow with me at the same age as her mother made her first sewing project with me...age 5. Her mother, Abby, sewed her first day kindergarten dress using a fabric panel printed with an A-line dress front,back and facings. When she told her teacher she made her dress, she told her it was wrong to lie. How wrong she was. We can teach children to sew!
Sunday, March 8, 2009
"Daisy, daisy. . ."
I have always considered my three nieces as my girls (complementing my 2 boys) and they love that I do things with them and for them. This quilt was made for Autumn, Abby's daughter, in 2007. The Retro fabrics and pattern were her choice.
I found this pattern in an old issue of Traditional Quilts, issue 57. “Appalachian Sunset”, designed by Paula Hammer was done in feedsack prints. A warning: I cut all my pieces using the templates provided. I didn't discover that one was reversed until I started sewing. Fortunately it was a background white on white print that didn't really show in the final product. MAKE A TEST BLOCK BEFORE CUTTING THE REST!
I paid dearly to have this custom quilted but the result was worth every penny.
The prairie points were not folded but backed, stitched and turned. This allowed me to use multiple strips of leftover fabric for the front.
Wednesday, March 4, 2009
"MAGICAL MUD", Retrospect of AMOCA exhibits
I made this quilt as a fund raiser for The American Museum of Ceramic Art, Pomona, CA. where my sister is director/curator. This quilt is reminiscent of the many different exhibits held at American Museum of Ceramic Art. Some of the fabric appliqués represent ceramics in AMOCA’s permanent collection. Beginning in April, the quilt will be raffled to benefit AMOCA’s ceramic education programs. Look for the announcement on AMOCA's website.
The background was my first attempt at stippling. It was easier that I thought. The quilting design for each pot was customized to fit the shape and glaze. Additional embroidered titles and names were added to feature the artists, exhibit, or style of the ceramic piece.
Tuesday, March 3, 2009
"GEISHA"
When I found this Geisha fabric, I knew I had to design something original to feature these ladies. Finding my inspiration in Quilting with Japanese Fabrics by Kitty Pippen,
I mapped out my plan on graph paper. Of course not all the angles and pieces fit perfectly, so I added strips and triangles to fill in the gaps.
From The Classic Quilting of Sashiko, by Ondori, I chose traditional patterns to quilt in the medallions with DMC cotton perle. In the background I used quilting thread to repeat more Japanese patterns and shadowed around the figures and garment details.
Designed & Hand Quilted by Aunt Janet for Abby in 2006
Subscribe to:
Posts (Atom)