This pattern was presented by one member of our class so I don't have a source for you.
1) Cut iron-on batting the desired length of runner. Position the center square of focus fabric on point.
2) Turn over, center the first strip of the opposite fabric from point to point. Sew additional strips alternating on either side until center square is quilted in place. trim to match size and shape of front square 3) seam 4 small triangles of 2nd focus to edges of trimmed strips. Press in place. 4) Turn over to 1st side, seam strips outward from center, automatically quilting triangles on 2nd side. 5) Con't alternating medium and small triangles and strips until desired length. Hint: Draw perpendicular and diagonal lines on batting to keep the runner square.
Saturday, February 28, 2009
Thursday, February 26, 2009
“SAND and SURF” optical illusions
As an artist, I am intrigued by optical illusions. Bea, the oldest and most experienced quilter in my class, shared a quilt made in this pattern. I knew immediately that I wanted to try it. "Storm at Sea" can be found easily in books, magazines and online but if you like optical illusions try Quilting Illusions by Celia Eddy published by Barrons.
Blue and yellow make a great color combination. This lap quilt is backed with flannel which makes it cozy while watching TV or reading a book.
I machine quilted in the ditch, following the pieced shapes.
Blue and yellow make a great color combination. This lap quilt is backed with flannel which makes it cozy while watching TV or reading a book.
I machine quilted in the ditch, following the pieced shapes.
Tuesday, February 24, 2009
“FLYING IN FORMATION”
My niece decorated Adam's room with an airplane theme. I found this block online and planned the arrangement to emphasize the diagonals (creates movement). The plaids seemed more appropriate for a little boy rather than the usual prints. Piano keys are a great way to repeat colors and use up scraps.
I hand quilted spirals over each plane, zigzags in the border, and down the center of the sashing.
Adam' favorite part of the quilt is the flannel backing. The print included airplanes, cars, buses, and roads on which he runs his toy vehicles.
I hand quilted spirals over each plane, zigzags in the border, and down the center of the sashing.
Adam' favorite part of the quilt is the flannel backing. The print included airplanes, cars, buses, and roads on which he runs his toy vehicles.
Monday, February 23, 2009
"JOURNEY to the ORIENT" 2003-2004
This quilt started as a twin/day bed cover (the center panels). We moved the same year and the project grew into a king size quilt. I was oh so green. Based on my garment sewing skills, I cut with scissors and pieced my design.
I found the snails trail pattern online but the fan on the sides, I developed on my own.
My love of all things Asian came early on from my father who spent a month in Japan when I was only five. He came home with crates full of Japanese arts and crafts. Mother sewed with the fabrics and decorated our home. These objects and Dad's experience became my favorite thing to share at school through Jr. High.
By the time I was ready to machine quilt, my teacher friend recommended Mountain Quilters in Sky Forest, CA. They did a fantastic custom quilting job, making all my "lumps" disappear.
Sunday, February 22, 2009
"COMPLEMENTS" Strips ‘n Curves
The name for this quilt reflects the loving relationship I have with my sister, Christy. Our similar interests and talents, art and creativity, and our different strengths complement each other. We are an inseparable team. Complements such as red and green enhance and intensify one another just as sisters support each other.
I followed the instructions in Louisa L. Smith's book, Strips 'n Curves but made my own templates rather than purchasing hers. A complementary color scheme in a range of values (light to dark) guarantees a pleasing dramatic look.
I quilted this lap size quilt myself. I followed the stripes and curves, sometimes "stitching in the ditch" and other times continuing the circles across the stripes.
Saturday, February 21, 2009
"POOH & FRIENDS"
My choice of theme for my first grandson's blanket was easily based on his mother's lifelong love of Winnie the Pooh. At the time, my quilt class was shown how to combine redwork with crayon embellishment. I adapted the snowball blocks to feature characters from a Disney coloring book.
Using Crayola brand, I colored in the designs, set with an iron, and then outlined with embroidery floss. In the borders I embroidered the sayings most often used by Pooh and his friends. Hint: Place paper towels over and under the coloring when ironing in crayon. This sets the color although it will fade somewhat in washing.
I used flannel in the front and back. The squares came from scraps of baby blankets and PJ's I had made for my boys and family. The backing fabric of Pooh and buzzing honey bees gave me the pattern to follow for hand quilting.
Thursday, February 19, 2009
"SHADES of CURVES": Winding Ways
The idea of a black/white value scale intrigued me. I found this pattern, "Sunset Wheel of Mystery", designed by Brooke Flynn in Fons & Porter's Love of Quilting March/April 2004 (known as "Winding Ways"). The finished queen size quilt was a perfect fit for Krista, my daughter-in-law, who is a photographer and loves to print in black and white (link to her blog under favorites).
The touch of red was a perfect accent. The layout was achieved by using a display wall. The least expensive alternative to purchasing a commercial wall is a vinyl flannel backed tablecloth. By hanging it on an existing curtain rod, you can used the back like a flannel board to "stick" the blocks up in a pleasing arrangement.
I had the perfect backing fabric in my stash but was short by 18" in the width. Using the leftovers, I created an interesting insertion down the middle.
Wednesday, February 18, 2009
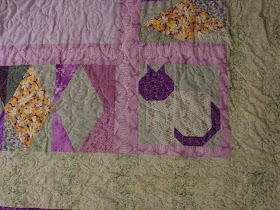
“COZY AS A CAT” Bento Box
I made this queen size quilt for my son and daughter-in-law. Melissa loves the color purple yet Andy wanted a masculine geometric design. This Bento Box pattern is featured in Successful Scrap Quilts by Judy Turner and Margaret Rolfe.
To create contrast in the concentric squares, I used both light and dark values and added Melissa's second favorite color, green and the complement of violet, yellow.
I like the challenge of using up the scraps on the back. My daughter-in-law, a Veterinarian, loves her pets so I included a cat on each corner.
Monday, February 16, 2009
“CHATTANOOGA CHOO CHOO”
My grandson loves his Thomas Train. There are plenty of Thomas prints to choose from but I wanted Benjamin's quilt to be unique. I googled and found this site: http://www.hobby-tronics.com/Chiloquilters/Block1_of_the_Month.html. I adapted the blocks I found online and backed the quilt with Thomas fabric.
Saturday, February 14, 2009
“SERENITY”
Friday, February 13, 2009
"KAPPA KAPPA GAMMA" Memory quilt for Missy
My niece, Missy, asked me to make a quilt from her sorority T-shirts and sweats. I cut all the rectangles twice as long as wide. These proportions give you more options in the arrangement. The key to using knits in a quilt is to back each piece with a stablizer (iron-on light weight interfacing). Hint: I would avoid using heavy sweatshirt fabric. I removed the stablizer from these rectangles after it was assembled because they were too stiff.
Thursday, February 12, 2009
“WINGS”
My husband has a passion for airplanes. I designed and machine quilted this lap quilt for him. It was my first experience with free motion quilting and quite successful. Some of the fabrics I found at various shops but others I ordered on-line. The asymmetrical layout and the variations in block design were inspired by Quilting with Japanese Fabrics by Kitty Pippen.
BERRIES N’ CREAM
One of my recent favorite quilts was made for my niece, Abby. It's a king size adaptation of "Orange Peel". I find it challenging to use variations of one color from my stash. Abby and I added some more fabrics to coordinate with the beige and maroons in one batik. No matter how many times I way "no more curves", I'm drawn to designs with curves. Hint: sew with the concave side up.